


2025/04/27 Microsoft Cloud Solutions 11 visit(s) 2 min to read
Ctelecoms

Newsletters in Outlook let you create and send structured, professional newsletters quickly within Outlook. This feature helps you keep your team informed and engaged. While in Preview, admins can enable it for some or all users in an organization. Users without access can't use this feature.
1.On the Outlook navigation bar, select Newsletters (or go to outlook.office.com/newsletters for web users).
2.On the Home tab, click Create newsletter.
3.In the Select a template window, choose from a blank template, a preset template, or a custom template.
4.When saving your newsletter, the "Save" window will prompt you for a title. You'll also need to choose whether to save it as a Newsletter or a Template using the provided dropdown. If you want to save it to your personal group page, select your name from the "Select group page" dropdown before clicking Save.
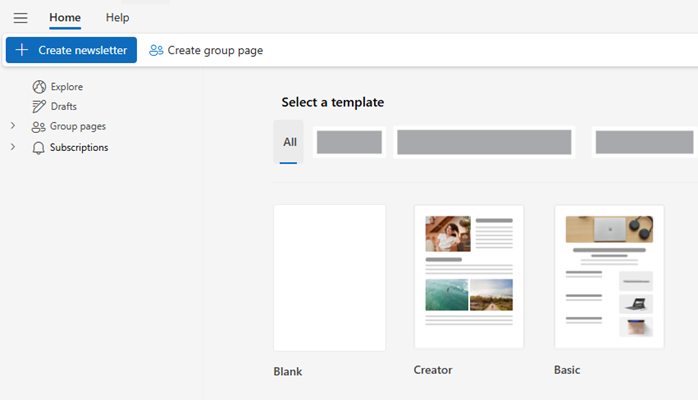
Templates are similar to newsletters in structure but cannot be published, and you can't invite authors or contributors to them. You can either use a pre-designed template like "Creator" or "Basic," or you can create your own custom template by saving a newsletter draft as a template.
A newsletter in Outlook is structured around four main areas:
•Title: The primary heading of your newsletter.
•Header image (optional): You can upload your own image or choose from existing ones. It will be displayed with a default width of 704px and a 16:9 aspect ratio.
•Table of contents (optional): Add this to provide a clear outline and improve navigation through your newsletter's sections.
•Sections: These are the distinct parts of your newsletter, and you can invite multiple contributors to work on them.
Newsletters are organized into sections, allowing for one or more distinct content areas, each with its own contributors. Use the arrow controls to reorder these sections. To remove a section, click the "Delete section" ( icon). Deleted sections can be found in the "Deleted sections" area of the editor and can be restored with the "Restore section" button.
Improve your newsletter's organization and reader experience by adding a table of contents, which outlines your sections. Here's how:
1.In your newsletter, select Table of Contents (top right of any section).
2.The table of contents will appear at the top. Navigate to this section to edit the labels and links for each section.
Readers can then click the links in the table of contents to easily jump to the sections they want to read.
Add images and components
Use the ribbon to insert and format your newsletter content. You can add various components, tables, and emojis to create a well-organized and engaging newsletter.
Tip: Consider using tools like Sensitivity Labels and the Accessibility Checker, also found in the ribbon, to ensure your content is appropriate and accessible to everyone.
When working with text, the Format Text tab provides a range of formatting commands.
1.Adding Images:
If you're using the simplified ribbon, go to the Home tab and select Pictures. From there, you can either Browse this computer to upload your own image or Browse images to select from stock options.
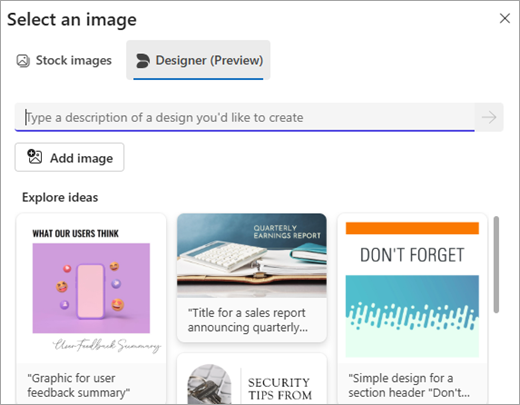
Explore the Designer tab for AI-powered design ideas and graphic creation. Here, you can generate image layouts with or without text, upload your own images for editing and enhancement.
You can also upload images directly to a component, or paste an image in a section.
2.Editing images
To edit an image you've inserted, simply select it. This will activate the Picture Format tab, where you'll find various editing options. Here, you can:
•Apply borders and shadows to enhance the image's appearance.
•Add alt text to improve accessibility for screen readers.
•Crop, rotate, and resize the image by dragging its corner handles.
3.Add pre-made layout components
Components are ready-to-use layout elements that streamline newsletter creation and ensure visual consistency, especially when adding images.
Access Components by selecting Components under the Newsletter tab. If you've added a new section, click Add component at the bottom.
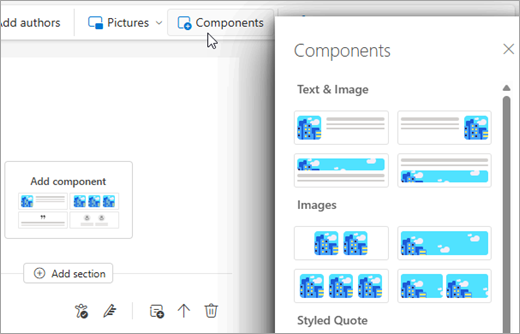
The Components pane provides four types:
•Text & Image: Combine text and images with adjustable sizes (small to extra large).
•Images: Display images in various formats and sizes. Full-size images default to 696px width (16:9 aspect ratio) and auto-crop; drag to center.
•Styled Quote: Highlight quotes with a pre-designed style.
•People: Showcase individuals or team members.
Collaborate with co-authors and contributors
Outlook newsletters allow for collaboration through two roles: co-authors and contributors.
Co-authors possess full permissions to edit and publish the entire newsletter. Invite them using the icon next to your profile picture (above the Title) or the Add authors button in the Ribbon. You can have up to 25 co-authors per newsletter.
Contributors have limited access, able to edit only the specific sections they are invited to. Add contributors to individual sections by selecting Add contributor at the top left of each section. A single section can have a maximum of 30 contributors.
Invited co-authors and contributors will receive email notifications and can access their assigned newsletters in the Drafts section of the newsletter navigation.
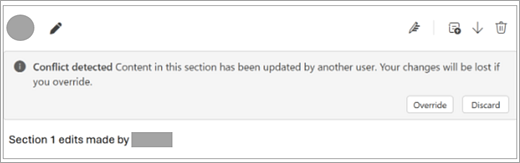
Important Note: Real-time collaboration and version history are not currently available in Outlook newsletters. If multiple users edit the same section simultaneously, a conflict notification will appear for the second user attempting to save.
Conflict Resolution: When a conflict occurs, you can choose to:
1.Override: Keep your changes and replace the existing content.
2.Discard: Lose your changes and adopt the latest saved version.
Preview and publish a newsletter
1- Previewing Your Newsletter:
Before publishing, use the Preview button at the top of the newsletter editor to see how your newsletter will appear. You can also email a preview to yourself to check its rendering across different email clients.
2- Publishing Your Newsletter:
Once you're satisfied with your preview, click Next in the top right corner of the editor to proceed to the publishing settings.
3- Sender Options:
Outlook newsletters allow you to specify an alternate sender, but this feature is only available when publishing from Group pages. You can select a different author to send the newsletter, without changing the original author. The alternate sender will receive an email notification and will be able to send the newsletter.
Note: Sending newsletters from Groups or distribution lists is not currently supported. As a workaround, you can send from a mailbox-enabled user account or send from an individual account and set the reply-to address to a group if desired.
4-Recipient Options:
Outlook newsletters support various recipient types:
•To Recipients: These are the primary recipients you enter in the publish form.
•CC Recipients: By default, all owners of the Group page and the current publisher will be added to the CC field.
•BCC Recipients: By default, all subscribers of the Group page will be added to the BCC field.
You can add individual user email addresses or distribution lists (DLs) as recipients, similar to sending regular Outlook emails. The maximum number of recipients per type is determined by your organization's sending limits. Note that a distribution list or group counts as a single recipient.
Important: Sending newsletters to recipients outside your organization is not yet supported.
5- Visibility Settings:
When publishing, you can choose between two visibility options:
•Public: The newsletter will be visible to everyone.
•Unlisted: The newsletter will only be accessible to the recipients and anyone with a direct link. It will not appear on the Explore page.
6- Post-Publish Actions:
You can re-publish a newsletter by navigating to Newsletter > Edit. To move a newsletter to a different page without re-publishing, go to Newsletter > Move (found in the overflow button).
Group pages
Want to collaborate with multiple authors on a distinct newsletter? We recommend creating a Group page. Here's how: From the Newsletters section, go to the Home tab and click Create group page.
Each Group page needs at least two owners and can accommodate up to 100 co-owners, who have the same level of control as the owners. You can also customize your Group page with a cover image and an optional logo.
When setting up your Group page, you have these visibility choices:
•My organization (Default): Makes the page discoverable and accessible via direct link to anyone in your organization.
•Unlisted: Keeps the page hidden from the Explore page but accessible to those with a direct link.
As an owner or co-owner, you'll also have access to valuable insights like analytics and subscriber data, and you can export the group page's information.
Disable subscriptions
To disable newsletter subscriptions and manage recipients manually:
1.Go to your Group Page.
2.Select Edit.
3.Toggle use custom distribution to on.
Optionally, you can specify a distribution list (DL), which will be automatically added to the BCC field of your newsletters.
Explore other newsletters
Outlook newsletters features an Explore section, accessible via the navigation menu, where you can browse newsletters shared within your organization. The Explore page is organized into the following sections:
•Featured Newsletters: A curated list of recently published newsletters, ranked by user engagement metrics such as views, reactions, and comments. Currently, the selection of featured newsletters cannot be customized by organizations.
•Group Pages: Displays the group pages within your organization that have the highest number of subscribers.
•New Pages: Shows the most recently created group pages in your organization.
•Subscribed Pages: Lists the group pages that you have personally subscribed to.
Within each section of the Explore page, you'll see summary cards that allow you to easily subscribe to interesting pages or authors. Each section can be expanded by clicking the chevron button to reveal more cards.
Please note that newsletters or group pages marked as "unlisted" will not appear in the Explore page. These can only be accessed via a direct link shared by the newsletter authors or group page owners.
Newsletter analytics
For both Group pages and individual newsletters, you can track their engagement by viewing the number of opens (via email or the newsletters app) as well as the number of comments and reactions they've received.
Outlook newsletters provide a valuable tool for enhancing internal communication within organizations. By following the steps and utilizing the features detailed in this guide, businesses can create and distribute effective newsletters. For Saudi businesses seeking to fully integrate and optimize Outlook and the broader Microsoft 365 ecosystem, Ctelecoms, as a Microsoft Gold Partner, offers comprehensive support. We help businesses of all sizes unlock the full potential of these tools, leading to improved communication and productivity.
Take your IT infrastructure to the next level ...